配置一台新的 Proxmox Server
在将原先的一个 Proxmox 服务器拆成 TrueNAS + Proxmox 之后,买没有来得及好好配置这台新的 Proxmox 。这篇文章就记录一下这台 AMD CPU 的 Proxmox 服务器安装之后的配置过程。

这台 AMD CPU 的 Proxmox 服务器安装时的选项如下:
- 1 TB SATA SSD Drive in EXT4 for Boot.
- 2 TB NVME SSD Drive for VM Storage.
- 单盘 ZFS 也是有些好处的。
- 4 TB HDD Drive for VM Backups.
同时还有一张 RTX 3090 在这台机器上,然而因为因为这台机器没有 integrated GPU 也没有核显,所以这张卡并不打算 Passthrough 了。所以不仅不需要 black list Nvidia 的 Driver,反而需要安装 Nvidia 的 Driver,搞定 CUDA 和 CUDA Docker kit。
Update Repo
第一步一定是更新 Repository ,官方文档:
更新这个文件:/etc/apt/sources.list
/etc/apt/sources.list 内容改为:
deb http://ftp.debian.org/debian bookworm main contrib
deb http://ftp.debian.org/debian bookworm-updates main contrib

# Proxmox VE pve-no-subscription repository provided by proxmox.com,
# NOT recommended for production use
deb http://download.proxmox.com/debian/pve bookworm pve-no-subscription

# security updates
deb http://security.debian.org/debian-security bookworm-security main contrib
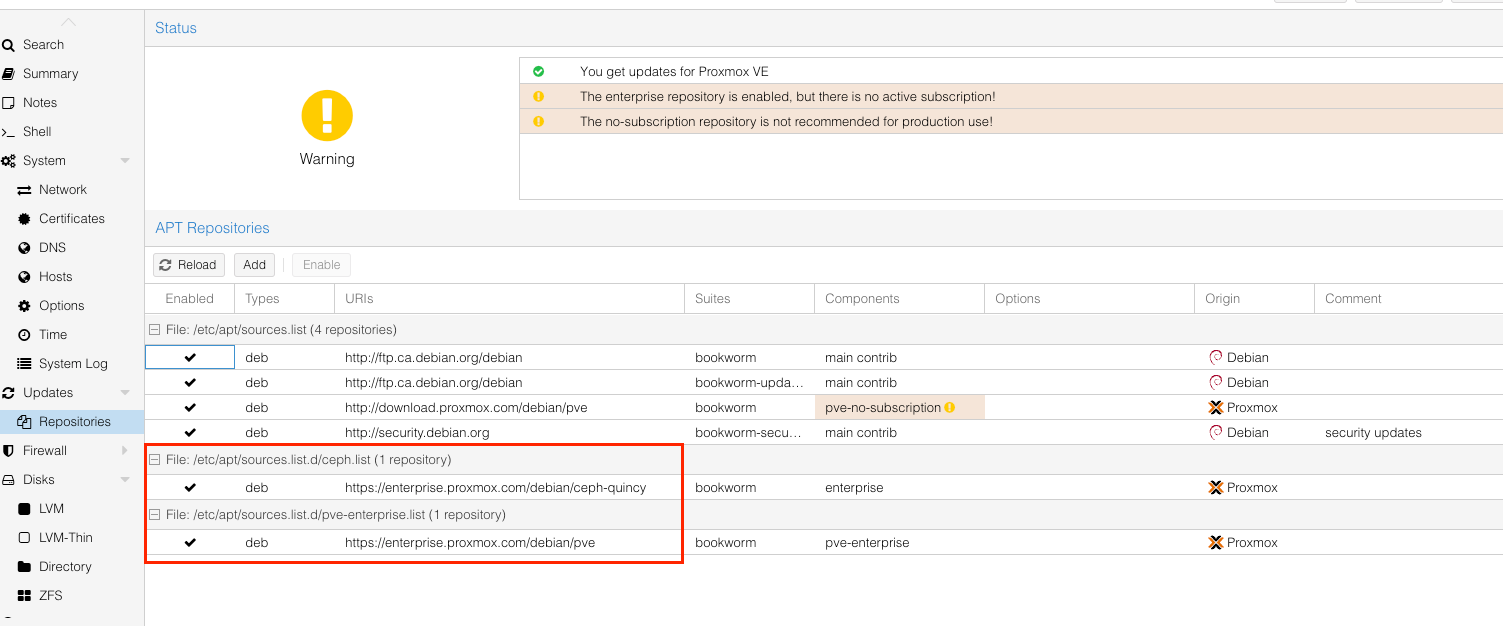
之后我们还需要把 Ceph 和 Enterprise 的 repository 关掉。这个可以通过注释掉 /etc/apt/sources.list.d/ceph.list 和 /etc/apt/sources.list.d/pve-enterprise.list 达成。但是更安全的做法是通过 UI 进行设定,disable 这些 repo 就可以了。

之后 apt update 就可以用了。
Config Swapiness
To temporarily disable swap:
swapoff -a
To persist that, remove/comment the swap entry in the /etc/fstab file.
注意这个 swapoff -a 还是会花一些时间才能返回的。有的时候可以长达十几分钟。
但是为了稳定性考虑,swap也不应该永远彻底关掉。在 memeory 彻底掉到 0 的时候,swap 还是要用一下,防止直接崩溃的。所以更推荐下面的做法:
sysctl vm.swappiness=0
这个 0 就代表了在 0% memeory remaining 的时候,允许 swap。
这个值的当前值可以通过这个查看:
cat /proc/sys/vm/swapiness
因为 swapoff 是直接彻底关闭 swap 直到下一次开机,所以如果当前改了 swapiness 但是之前已经 swapoff 了(因为要清空当前 swap 还是要用 swapoff),此时就需要 swapon -a.

Config ZFS
Proxmox 的 ZFS 设定对于轻量级的应用来讲可能不太友好。这里还是要手动设定一下的。
(似乎 Proxmox 8 的 default zvol blocksize 已经改为了16K,相比以前的 8K,应该已经对消费级的 SSD 友好了很多。当然,还是强烈不建议消费级的 SATA SSD。NVME 似乎还可以的,当然要考虑寿命问题。但是不至于像 SATA SSD 那样完全超乎预料的寿命消耗。)

ZFS 的设定有 FS 和 Pool 两个层面。ZFS 的参数可以通过 zfs get all <pool_name> 来查看所有的 settings。Pool 的参数需要通过 zpool get all <pool_name> 来查看。
- Set
autotrim=onfor SSD backed VM Poolzpool get autotrim <pool_name>-> VALUE: off (off by default).zpool set autotrim=on <pool_name>.
- Set
atime=offfor ZFS Poolzfs get atime <pool_name>-> VALUE: on (turned on by default)zfs set atime=off <pool_name>.
- 说实话个人不是很理解为什么 Proxmox 上面的 ZFS 默认是打开
atime的,毕竟绝大多数情况下这个设定根本不会有什么用,只会凭空大量消耗磁盘寿命。TrueNAS 上面默认 atime 就是关上的。 - 关于
atime的细节可以看这篇文章。同时另一个一定程度上能做到atime的大多数功能,但是不会那么大寿命和写入影响的选项是relatime。
- Set ARC max size
- ZFS on Linux (ZOL) 默认会直接用掉一半的系统内存。对于轻量的应用来讲,实在是有点奢侈了。如果没有那么高的IO读写需求(尤其是读缓存),但是需要多开虚拟机,那么还是把 ARC Size 调小比较好。
- Check current ARC stats:
cat /proc/spl/kstat/zfs/arcstats.cis the target size of ARC in bytesc_maxis the maximum size of the ARC in bytessizeis the current size of the ARC in bytes.
- Check the current ARC max limit in ZFS module.
cat /sys/module/zfs/parameters/zfs_arc_maxzfs_arc_min是下限。这个对于轻量应用来讲设置为0就可以了。
- Set the maximum limit to 8GB temporarily.
echo "$[8 * 1024 * 1024 * 1024]" > /sys/module/zfs/parameters/zfs_arc_max.
- Set the maximum limit to 8GB permanently.
vim /etc/modprobe.d/zfs.confoptions zfs zfs_arc_max=8589934592
- 如果修改的是 boot pool (i.e. rpool)。那么还需要更新一下 initramfs
update-initramfs -u -k all- 但是我这里 boot drive 用的是 EXT4,所以不需要做这个。
- 检查 TRIM 和 Scrub 的 cron job:
cat /etc/cron.d/zfsutils-linux.
以下是参考过的关于 ZFS Tuning 的资料,不过总体感觉,除非必要,不一定需要这么多设置:
)
Nvidia Driver
因为 Proxmox 的 Kernel Header 和 Debian 的 Kernel Header 不一样。所以这里最好不要用 Nvidia 的安装包(即 .run 文件)。
这里参考了这个 Gist:

总体来讲就是:
- 修改 /etc/apt/sources.list -> 这里在 debian.org 的 非 security 源 后面都加上
non-free.- 否则 nvidia-* 的 package 都找不到。
- 然后就是常规的
apt update,apt install pve-headers. apt install nvidia-driver-> 之后重启即可。
安装 nvidia-driver 的过程中应该是会提示 disable nouveau Driver 的。如果没有,那就在 /etc/modprobe.d/nvidia-installer-disable-nouveau.conf 里面加上:
# disable the opensource nouveau driver
blacklist nouveau
options nouveau modeset=0
小插曲
在 nvidia-driver 安装的时候,在最后的时候遇到这个错误:
System booted in EFI-mode but 'grub-efi-amd64' meta-package not installed!
Install 'grub-efi-amd64' to get updates.
Couldn't find EFI system partition. It is recommended to mount it to /boot or /efi.
Alternatively, use --esp-path= to specify path to mount point.
这应该是一个只有在使用 grub 作为 bootloader 的时候才会出现这个问题。不过实际上 reboot 之后并没有遇到什么问题。似乎 Proxmox 还是比较推荐使用 systemd_boot.
这里如果要 fix,那就按照推荐的,安装 apt install -y grub-efi-amd64.
nvidia-smi 验证成果:
+---------------------------------------------------------------------------------------+
| NVIDIA-SMI 535.183.01             Driver Version: 535.183.01   CUDA Version: 12.2     |
|-----------------------------------------+----------------------+----------------------+
| GPU  Name                 Persistence-M | Bus-Id        Disp.A | Volatile Uncorr. ECC |
| Fan  Temp   Perf          Pwr:Usage/Cap |         Memory-Usage | GPU-Util  Compute M. |
|                                         |                      |               MIG M. |
|=========================================+======================+======================|
|   0  NVIDIA GeForce RTX 3090        On  | 00000000:0A:00.0 Off |                  N/A |
|  0%   40C    P8              26W / 350W |      1MiB / 24576MiB |      0%      Default |
|                                         |                      |                  N/A |
+-----------------------------------------+----------------------+----------------------+

+---------------------------------------------------------------------------------------+
| Processes:                                                                            |
|  GPU   GI   CI        PID   Type   Process name                            GPU Memory |
|        ID   ID                                                             Usage      |
|=======================================================================================|
|  No running processes found                                                           |
+---------------------------------------------------------------------------------------+
这里的 Driver 版本是 535.183。这个需要注意,后面我们在 Container 里面用这个 GPU 的时候,需要用同样版本的 Nvidia Driver。


